如何基于Hyperf实现RabbitMQ+WebSocket消息推送
发布:smiling 来源: PHP粉丝网 添加日期:2022-06-12 12:05:39 浏览: 评论:0
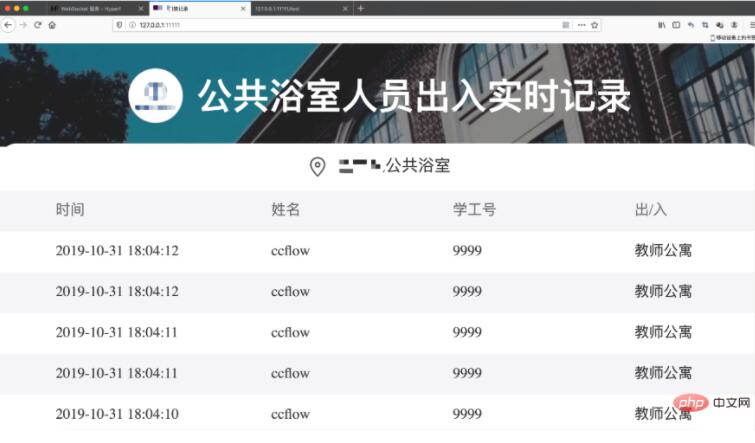
基于 Hyperf+ WebSocket +RabbitMQ 实现的一个简单大屏幕的消息推送。
思路
利用 WebSocket 协议让客户端和服务器端保持有状态的长链接,
保存链接上来的客户端 id。订阅发布者发布的消息针对已保存的客户端 id 进行广播消息。
WebSocket 服务
composer require hyperf/websocket-server
配置文件 [config/autoload/server.php]
- <?php
- return [
- 'mode' => SWOOLE_PROCESS,
- 'servers' => [
- [
- 'name' => 'http',
- 'type' => Server::SERVER_HTTP,
- 'host' => '0.0.0.0',
- 'port' => 11111,
- 'sock_type' => SWOOLE_SOCK_TCP,
- 'callbacks' => [
- SwooleEvent::ON_REQUEST => [Hyperf\HttpServer\Server::class, 'onRequest'],
- ],
- ],
- [
- 'name' => 'ws',
- 'type' => Server::SERVER_WEBSOCKET,
- 'host' => '0.0.0.0',
- 'port' => 12222,
- 'sock_type' => SWOOLE_SOCK_TCP,
- 'callbacks' => [
- SwooleEvent::ON_HAND_SHAKE => [Hyperf\WebSocketServer\Server::class, 'onHandShake'],
- SwooleEvent::ON_MESSAGE => [Hyperf\WebSocketServer\Server::class, 'onMessage'],
- SwooleEvent::ON_CLOSE => [Hyperf\WebSocketServer\Server::class, 'onClose'],
- ],
- ],
- ],
WebSocket 服务器端代码示例
- <?php
- declare(strict_types=1);
- /**
- * This file is part of Hyperf.
- *
- * @link https://www.hyperf.io
- * @document https://doc.hyperf.io
- * @contact group@hyperf.io
- * @license https://github.com/hyperf-cloud/hyperf/blob/master/LICENSE
- */
- namespace App\Controller;
- use Hyperf\Contract\OnCloseInterface;
- use Hyperf\Contract\OnMessageInterface;
- use Hyperf\Contract\OnOpenInterface;
- use Swoole\Http\Request;
- use Swoole\Server;
- use Swoole\Websocket\Frame;
- use Swoole\WebSocket\Server as WebSocketServer;
- class WebSocketController extends Controller implements OnMessageInterface, OnOpenInterface, OnCloseInterface
- {
- /**
- * 发送消息
- * @param WebSocketServer $server
- * @param Frame $frame
- */
- public function onMessage(WebSocketServer $server, Frame $frame): void
- {
- //心跳刷新缓存
- $redis = $this->container->get(\Redis::class);
- //获取所有的客户端id
- $fdList = $redis->sMembers('websocket_sjd_1');
- //如果当前客户端在客户端集合中,就刷新
- if (in_array($frame->fd, $fdList)) {
- $redis->sAdd('websocket_sjd_1', $frame->fd);
- $redis->expire('websocket_sjd_1', 7200);
- }
- $server->push($frame->fd, 'Recv: ' . $frame->data);
- }
- /**
- * 客户端失去链接
- * @param Server $server
- * @param int $fd
- * @param int $reactorId
- */
- public function onClose(Server $server, int $fd, int $reactorId): void
- {
- //删掉客户端id
- $redis = $this->container->get(\Redis::class);
- //移除集合中指定的value
- $redis->sRem('websocket_sjd_1', $fd);
- var_dump('closed');
- }
- /**
- * 客户端链接
- * @param WebSocketServer $server
- * @param Request $request
- */
- public function onOpen(WebSocketServer $server, Request $request): void
- {
- //保存客户端id
- $redis = $this->container->get(\Redis::class);
- $res1 = $redis->sAdd('websocket_sjd_1', $request->fd);
- var_dump($res1);
- $res = $redis->expire('websocket_sjd_1', 7200);
- var_dump($res);
- $server->push($request->fd, 'Opened');
- }
- }
WebSocket 前端代码
- function WebSocketTest() {
- if ("WebSocket" in window) {
- console.log("您的浏览器支持 WebSocket!");
- var num = 0
- // 打开一个 web socket
- var ws = new WebSocket("ws://127.0.0.1:12222");
- ws.onopen = function () {
- // Web Socket 已连接上,使用 send() 方法发送数据
- //alert("数据发送中...");
- //ws.send("发送数据");
- };
- window.setInterval(function () { //每隔5秒钟发送一次心跳,避免websocket连接因超时而自动断开
- var ping = {"type": "ping"};
- ws.send(JSON.stringify(ping));
- }, 5000);
- ws.onmessage = function (evt) {
- var d = JSON.parse(evt.data);
- console.log(d);
- if (d.code == 300) {
- $(".address").text(d.address)
- }
- if (d.code == 200) {
- var v = d.data
- console.log(v);
- num++
- var str = `<div class="item">
- <p>${v.recordOutTime}</p>
- <p>${v.userOutName}</p>
- <p>${v.userOutNum}</p>
- <p>${v.doorOutName}</p>
- </div>`
- $(".tableHead").after(str)
- if (num > 7) {
- num--
- $(".table .item:nth-last-child(1)").remove()
- }
- }
- };
- ws.error = function (e) {
- console.log(e)
- alert(e)
- }
- ws.onclose = function () {
- // 关闭 websocket
- alert("连接已关闭...");
- };
- } else {
- alert("您的浏览器不支持 WebSocket!");
- }
- }
AMQP 组件
composer require hyperf/amqp
配置文件 [config/autoload/amqp.php]
- <?php
- return [
- 'default' => [
- 'host' => 'localhost',
- 'port' => 5672,
- 'user' => 'guest',
- 'password' => 'guest',
- 'vhost' => '/',
- 'pool' => [
- 'min_connections' => 1,
- 'max_connections' => 10,
- 'connect_timeout' => 10.0,
- 'wait_timeout' => 3.0,
- 'heartbeat' => -1,
- ],
- 'params' => [
- 'insist' => false,
- 'login_method' => 'AMQPLAIN',
- 'login_response' => null,
- 'locale' => 'en_US',
- 'connection_timeout' => 3.0,
- 'read_write_timeout' => 6.0,
- 'context' => null,
- 'keepalive' => false,
- 'heartbeat' => 3,
- ],
- ],
- ];
MQ 消费者代码
- <?php
- declare(strict_types=1);
- namespace App\Amqp\Consumer;
- use Hyperf\Amqp\Annotation\Consumer;
- use Hyperf\Amqp\Message\ConsumerMessage;
- use Hyperf\Amqp\Result;
- use Hyperf\Server\Server;
- use Hyperf\Server\ServerFactory;
- /**
- * @Consumer(exchange="hyperf", routingKey="hyperf", queue="hyperf", nums=1)
- */
- class DemoConsumer extends ConsumerMessage
- {
- /**
- * rabbmitMQ消费端代码
- * @param $data
- * @return string
- */
- public function consume($data): string
- {
- print_r($data);
- //获取集合中所有的value
- $redis = $this->container->get(\Redis::class);
- $fdList=$redis->sMembers('websocket_sjd_1');
- $server=$this->container->get(ServerFactory::class)->getServer()->getServer();
- foreach($fdList as $key=>$v){
- if(!emptyempty($v)){
- $server->push((int)$v, $data);
- }
- }
- return Result::ACK;
- }
- }
控制器代码
- /**
- * test
- * @return array
- */
- public function test()
- {
- $data = array(
- 'code' => 200,
- 'data' => [
- 'userOutName' => 'ccflow',
- 'userOutNum' => '9999',
- 'recordOutTime' => date("Y-m-d H:i:s", time()),
- 'doorOutName' => '教师公寓',
- ]
- );
- $data = \GuzzleHttp\json_encode($data);
- $message = new DemoProducer($data);
- $producer = ApplicationContext::getContainer()->get(Producer::class);
- $result = $producer->produce($message);
- var_dump($result);
- $user = $this->request->input('user', 'Hyperf');
- $method = $this->request->getMethod();
- return [
- 'method' => $method,
- 'message' => "{$user}.",
- ];
- }
最终效果
Tags: Hyperf RabbitMQ+WebSocket
分享到:

- 上一篇:用Composer构建属于你的PHP框架
- 下一篇:最后一页
推荐文章
热门文章
最新评论文章
- 写给考虑创业的年轻程序员(10)
- PHP新手上路(一)(7)
- 惹恼程序员的十件事(5)
- PHP邮件发送例子,已测试成功(5)
- 致初学者:PHP比ASP优秀的七个理由(4)
- PHP会被淘汰吗?(4)
- PHP新手上路(四)(4)
- 如何去学习PHP?(2)
- 简单入门级php分页代码(2)
- php中邮箱email 电话等格式的验证(2)