Smarty模板类内部原理实例分析
发布:smiling 来源: PHP粉丝网 添加日期:2021-12-01 11:06:05 浏览: 评论:0
本文实例讲述了Smarty模板类内部原理。分享给大家供大家参考,具体如下:
之前在学习ThinkPHP的时候,有接触到Smarty模板类,但是一直不知道其内部实现的原理,博主今天终于知道了其内部原理,其实也挺简单的,然后写了一个迷你版的Smarty模板类,对理解其内部原理有了很大的帮助。
1、迷你版Smarty类
首先上代码,最后再进行讲解。
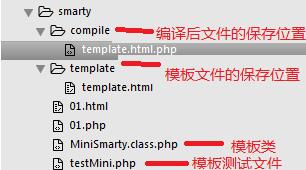
项目结构图

MiniSmarty类代码(MiniSmarty.class.php)
- <?php
- /**
- * 迷你模板类
- */
- class MiniSmarty{
- public $template_dir = '';//模板文件放置的目录
- public $compile_dir = '';//编译后文件放置的目录
- public $tpl_var = array();//模板赋值的变量
- /**
- * 给模板进行赋值
- * @param str $key 键
- * @param mixed $value 值
- * @return void
- */
- public function assign($key,$value){
- $this->tpl_var[$key] = $value;
- }
- /**
- * 编译模板,并引入编译后的文件
- * @param str $template 模板文件
- * @return void
- */
- public function display($template){
- $compile_file = $this->compile($template);
- include($compile_file);
- }
- /**
- * 将模板文件编译成php文件
- * @param str $template 模板文件名
- * @return str 编译文件名
- */
- private function compile($template){
- $template_file = $this->template_dir.'/'.$template;
- //读取模板文件中的内容
- $source = file_get_contents($template_file);
- //判断是否需要再次生产编译文件
- $compile_file = $this->compile_dir.'/'.$template.'.php';
- //如果存在编译文件且编译文件的修改时间比模板文件大,则不用再次编译,直接返回文件路径
- if(file_exists($compile_file) && filemtime($compile_file) > filemtime($template_file)){
- return $compile_file;
- }
- //解析{$}为<?php echo 等操作
- $source = str_replace('{$', '<?php echo $this->tpl_var[\'', $source);
- $source = str_replace('}', '\'];?>', $source);
- //生成编译文件
- file_put_contents($compile_file, $source);
- //返回编译后的文件路径
- return $compile_file;
- }
- }
- ?>
测试模板类代码(testSmarty.php)
- <?php
- //1、引入并创建模板实例
- include ('./MiniSmarty.class.php');
- $Smarty = new MiniSmarty();
- $Smarty->template_dir = './template';
- $Smarty->compile_dir = './compile';
- //2、给模板对象赋值
- $title = '两会召开';
- $content = '好奶粉,好会议,好新闻';
- $Smarty->assign('title',$title);
- $Smarty->assign('content',$content);
- //3、显示模板
- $template = 'template.html';
- $Smarty->display($template);
- ?>
模板文件(template.html)
- <!DOCTYPE html>
- <html>
- <head>
- <meta charset="utf-8">
- <meta http-equiv="X-UA-Compatible" content="IE=edge">
- <title>{$title}</title>
- <link rel="stylesheet" href="">
- </head>
- <body>
- <h3>{$content}</h3>
- </body>
- </html>
编译后的文件(template.html.php)
- <!DOCTYPE html>
- <html>
- <head>
- <meta charset="utf-8">
- <meta http-equiv="X-UA-Compatible" content="IE=edge">
- <title><?php echo $this->tpl_var['title'];?></title>
- <link rel="stylesheet" href="">
- </head>
- <body>
- <h3><?php echo $this->tpl_var['content'];?></h3>
- </body>
- </html>
代码都贴完了,最后解释一下。在测试模板类(testSmarty.php)文件中,首先是引入模板类文件,实例化模板对象,然后给模板对象赋值,最后显示模板。在模板类(MiniSmarty.class.php)文件中,有3个属性和3个方法,属性分别是template_dir 、compile_dir‘和tpl_var,含义分别是模板文件的路径、编译后文件的路径、模板对象的变量。3个方法分别是assign、display和compile,assign方法是给模板对象赋值,display方法是编译模板文件,并引入(显示)编译后的文件,compile方法是编译模板文件。编译模板文件的过程主要是将模板文件中的{$标签}解析成<?php echo $var?> 等php代码。
2、Smarty原理分析
工作流程
(1)把需要显示的全局变量,赋值,塞到对象的内部属性中的一个数组里
(2)然后编译模板,将{$标签}解析成相应的php echo 代码
(3)引入编译后的php文件
使用步骤
(1)Smarty是一个类,要使用的话,必须引入在进行实例化
(2)使用assign给模板赋值
(3)使用display方法【从编译到输出】
Smarty的缺点
(1)编译模板,浪费时间
(2)要把变量再重新赋值到对象的属性中,增大了开销
Tags: Smarty模板类原理
推荐文章
热门文章
最新评论文章
- 写给考虑创业的年轻程序员(10)
- PHP新手上路(一)(7)
- 惹恼程序员的十件事(5)
- PHP邮件发送例子,已测试成功(5)
- 致初学者:PHP比ASP优秀的七个理由(4)
- PHP会被淘汰吗?(4)
- PHP新手上路(四)(4)
- 如何去学习PHP?(2)
- 简单入门级php分页代码(2)
- php中邮箱email 电话等格式的验证(2)
